Using WebSockets for asynchronous events with Amazon AWS Serverless

Adding real-time asynchronous events to your web applications can make them a more dynamic and engaging experience. We’ll explore how to add asynchronous notifications and updates to a web application using AWS and their serverless tools. The implementation here has very little code and infrastructure to manage and provides a solution that scales.
Benefits
The benefits of asynchronous events are many: First, they make your app more dynamic and engaging, with your front end representing the state of your backend instantly and at all times.
There are several other benefits too, with WebSockets reducing the need for the front end to poll the backend continually, reducing bandwidth and client and server load. Another benefit of this technology is that it is API agnostic and allows the user to send data across it using whichever messaging protocol they like, be it JSON, XML, STOMP etc.
No matter how many times your client connects to the backed or if they are working on a shared application (like Producer at Grabyo) – all clients see the same state at the same time.
Services we’ll be using
We’ll be using the following AWS services to implement our solution:
- Amazon API Gateway – WebSocket and HTTP gateway
- AWS Lambda – API Gateway routes to our Lambdas
- Amazon DynamoDB – persists our client connections
In our solution, we can enhance the example below with the addition of:
- Amazon ElastiCache – stores WebSocket authentication tokens – we could use DynamoDB for this instead
- Amazon Simple Notification Service (SNS) – to provide our services with an agnostic way of sending asynchronous events to clients
Implementation
Amazon API Gateway supports real-time, two-way communications via any WebSocket client. It manages persistence and state of the client connection and connects to any backend which API Gateway currently supports.
When you first create a WebSocket API in API Gateway, you will be issued a WebSocket URL and a Connection URL:
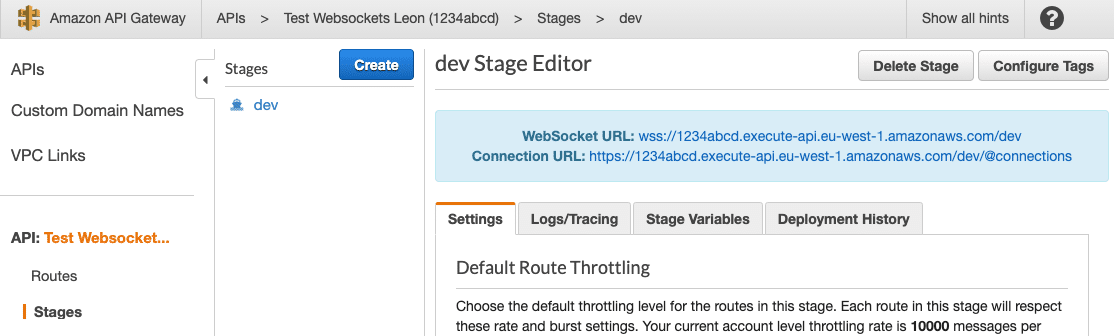
The WebSocket URL takes the form:
wss://[unique-id].execute-api.[region].amazonaws.com/[stage-name]
A WebSocket client can then create a HTTP request and perform a WebSocket handshake with API Gateway, resulting in an HTTP connection Upgrade request to API Gateway. On success, a persistent, stateful WebSocket connection is established between client and API Gateway, with API Gateway tracking connection state.
On connect, the user is authenticated once during their initial UPGRADE request. After that, other frames on the WebSocket connection are not authenticated because the connection is stateful and API Gateway maintains information about the sender.
API Gateway WebSockets are uni-directional by default. Therefore, if you want to pass the result of a route back to the client, you will need to enable an Integration response per route, in which case the client will receive a response from the backend service.
When you create your WebSocket API in API Gateway, you specify a Route Selection Expression like so $request.body.action. This helps determine how your JSON message is routed. For example, here action is sendmessage , so this will hit the sendmessage route, which triggers our Lambda:
{"action":"sendmessage", "data":"hello world"}
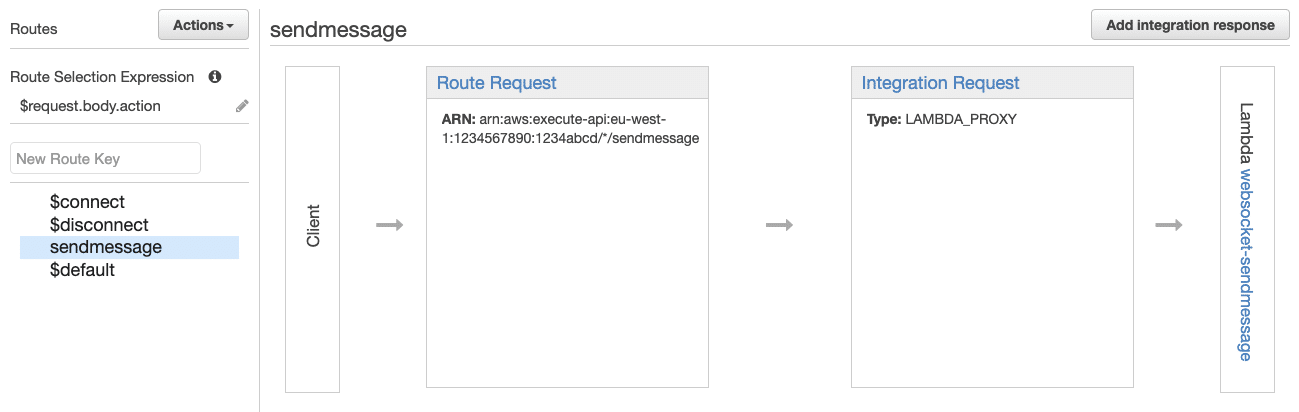
API Gateway has the following built-in routes, $connect and $disconnect and $default. The first two are self-explanatory and are hit when a client connects and disconnects, respectively – $default acts as a catch-all for when API Gateway can’t locate the route.
Connecting
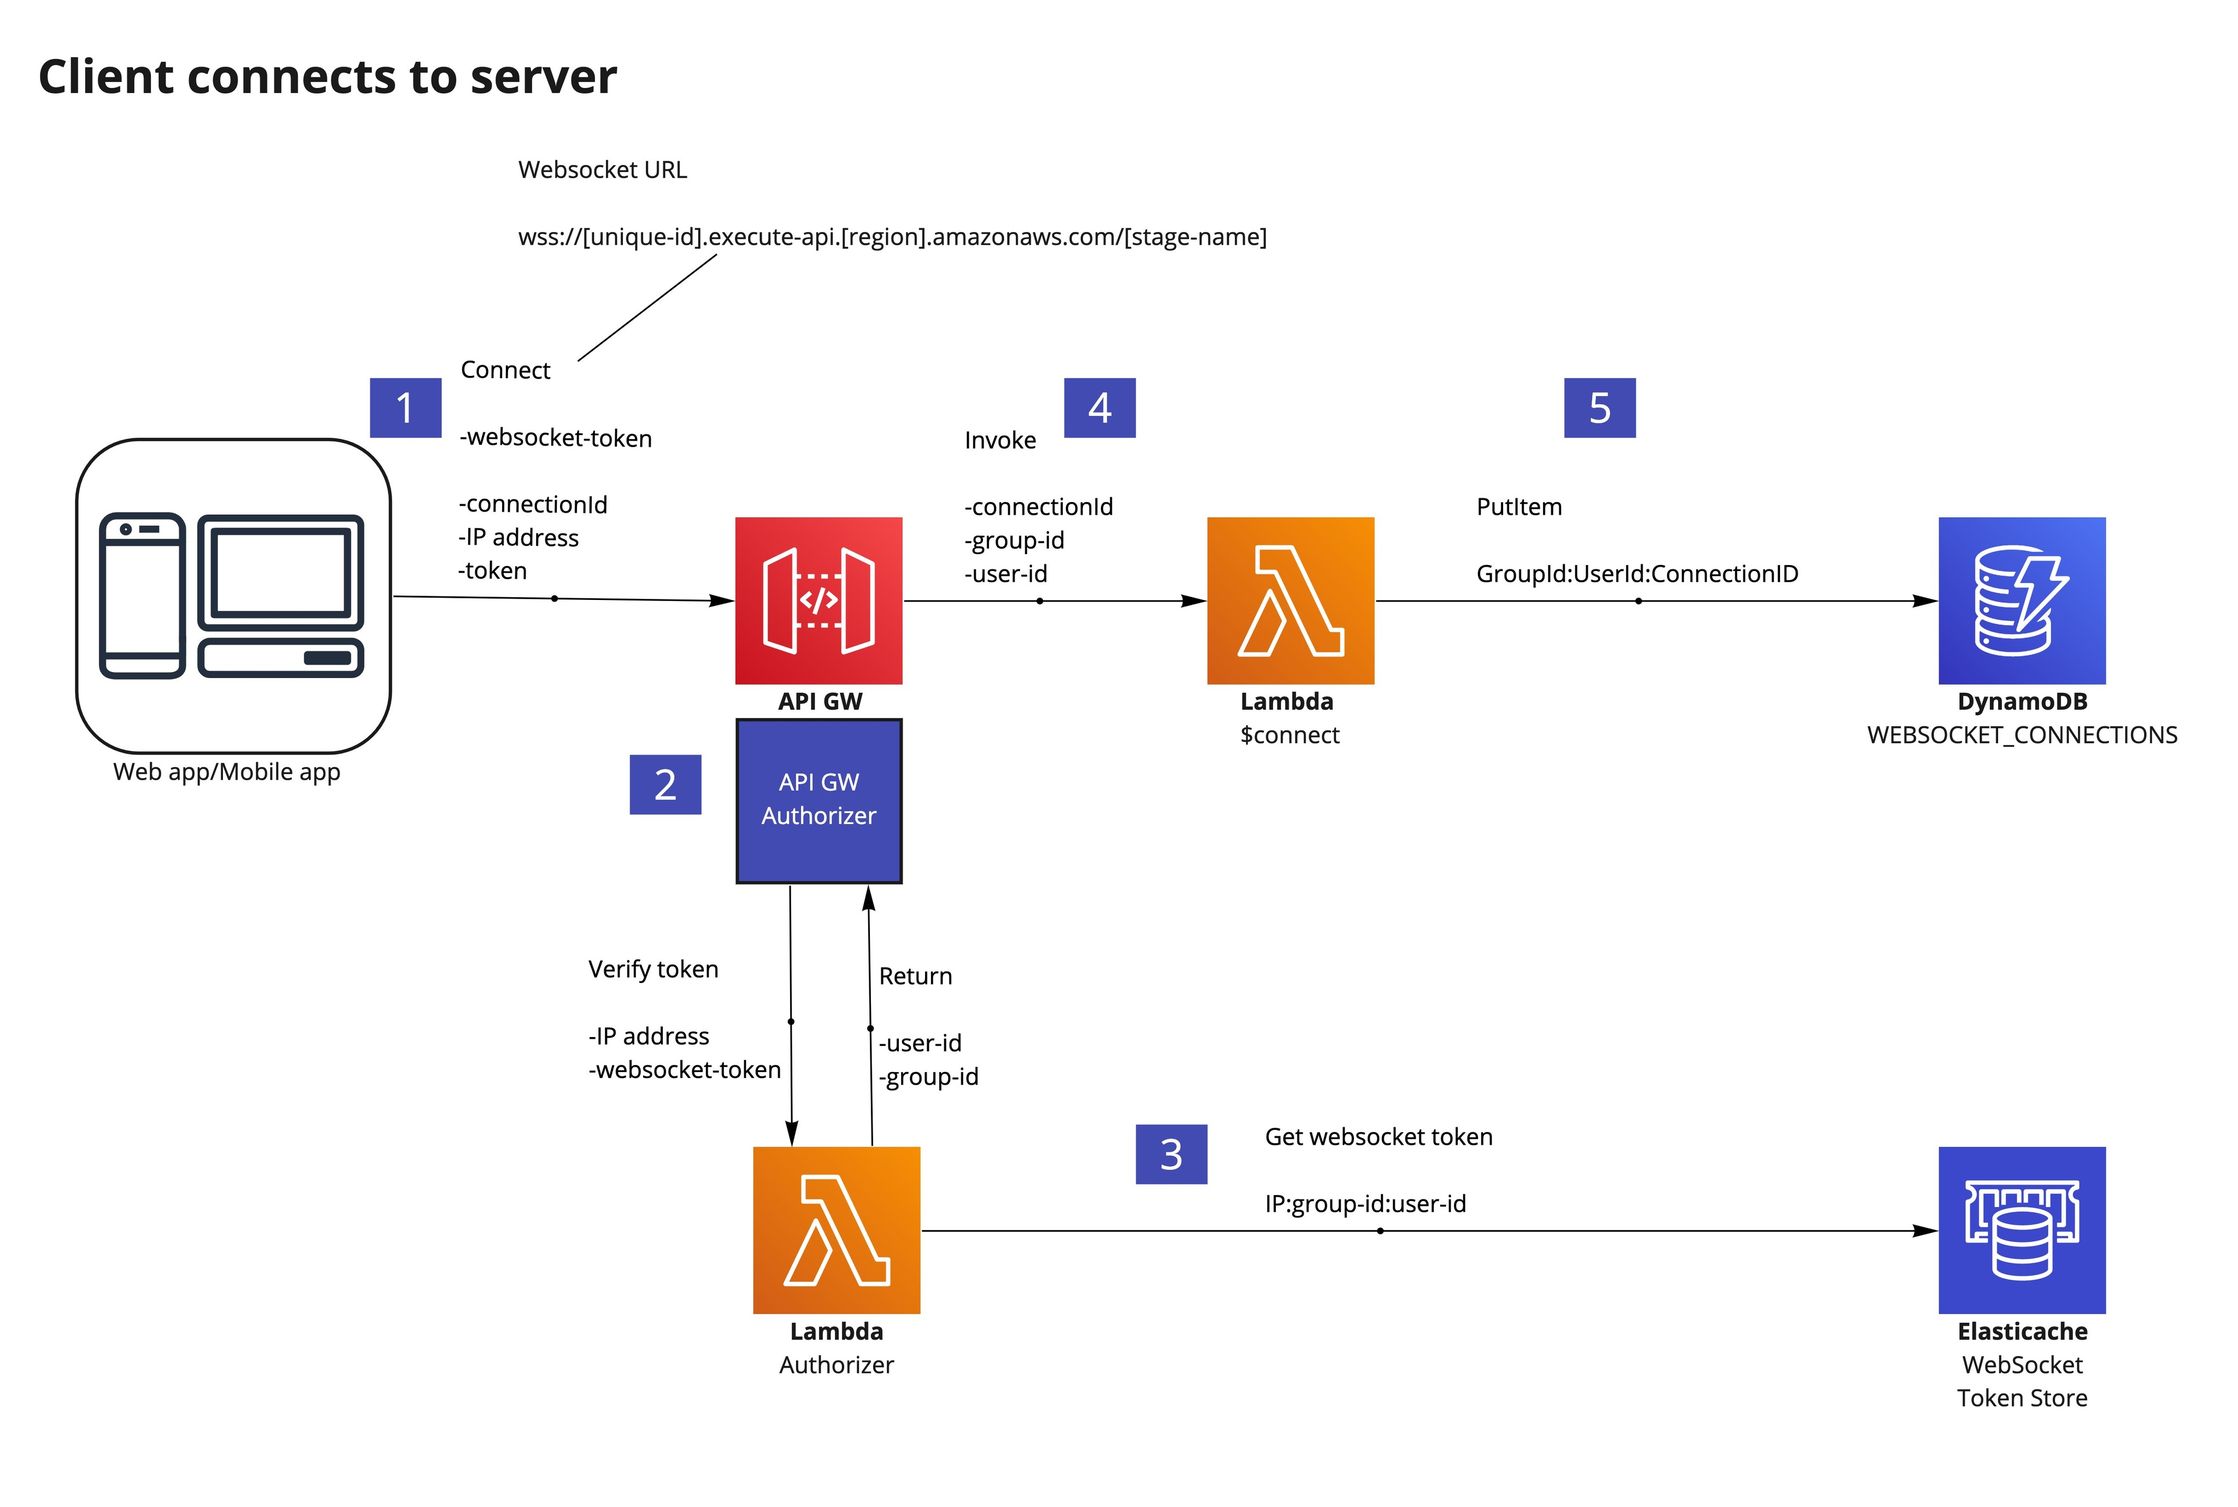
API Gateway will hit the $connect route on the first connection, invoke an Authorizer if it exists (see section Authorization for details on a suggested flow), and issue a connectionId. This value uniquely identifies every client WebSocket connection and can be persisted alongside your internal userId and the API Gateway connectionId in DynamoDB.
Persisting this ID allows us to uniquely message and identify the client by userId or connectionId within your backend application.
When the client sends a message through a WebSocket, the message (called a frame) invokes the backend. So on the same connection, we can send multiple frames from the client or the backend.
Whilst the client remains connected to API Gateway, the same connectionId is used throughout the connection’s lifetime and the WebSocket connection will not need to be opened and closed. That said, connections do close after 10 mins if no traffic is sent over them and have a max lifetime of 2 hours, after which they will need to be re-established.
Our connection architecture and flow look like this:
Connecting – implementation
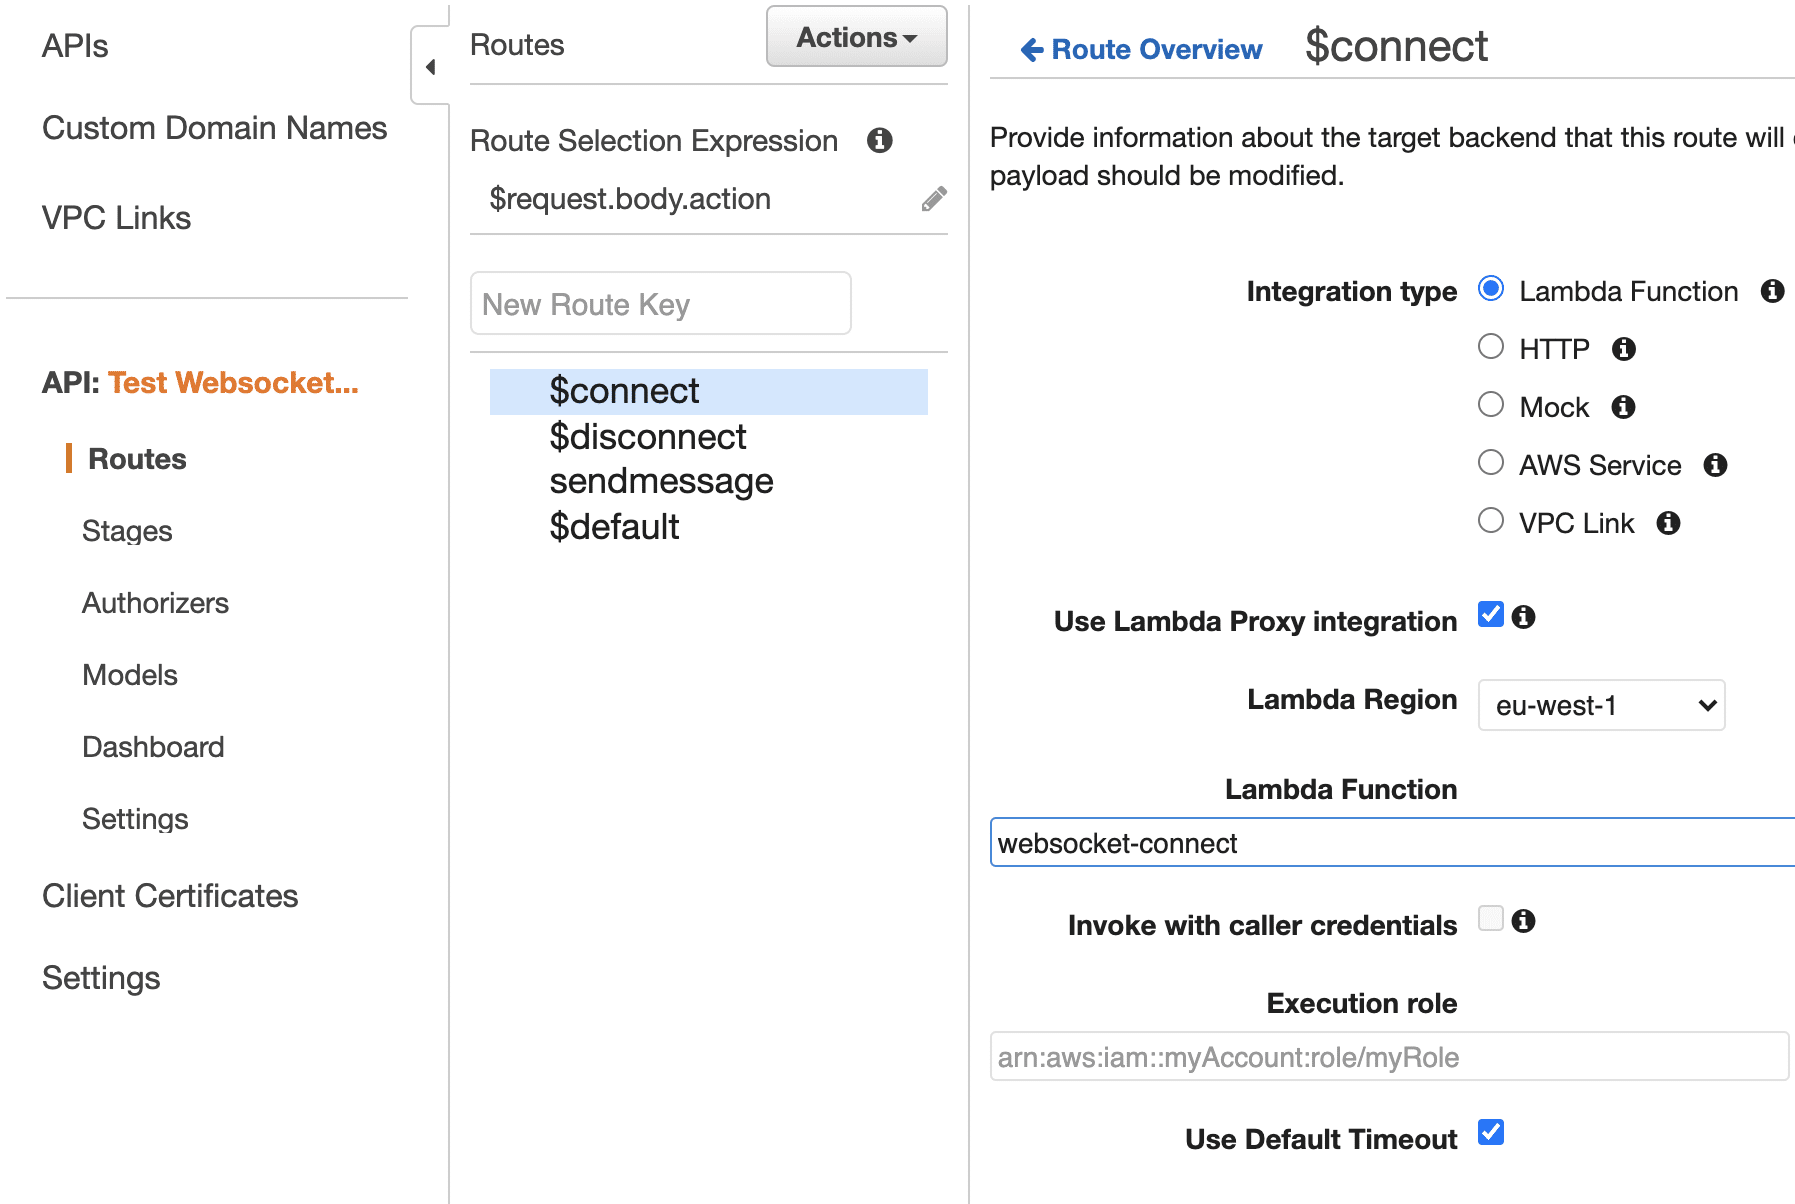
For our implementation, we first create a DynamoDB table called WEBSOCKET_CONNECTIONS, and a Node.js Lambda called websocket-connect[2]. This Lambda processes API Gateway events from the $connect route and looks for the client’s connection ID, persisting it in our DynamoDB table.
Here is a preview of how that looked:
We setup an environment variable here called TABLE_NAME WEBSOCKET_CONNECTIONS.
We then need to point our API Gateway $connect route to our newly created Lambda:
To test, install websocat or wscat and run them from multiple Terminal windows to establish various WebSocket client connections.
$ websocat wss://1234abcd.execute-api.eu-west-1.amazonaws.com/dev
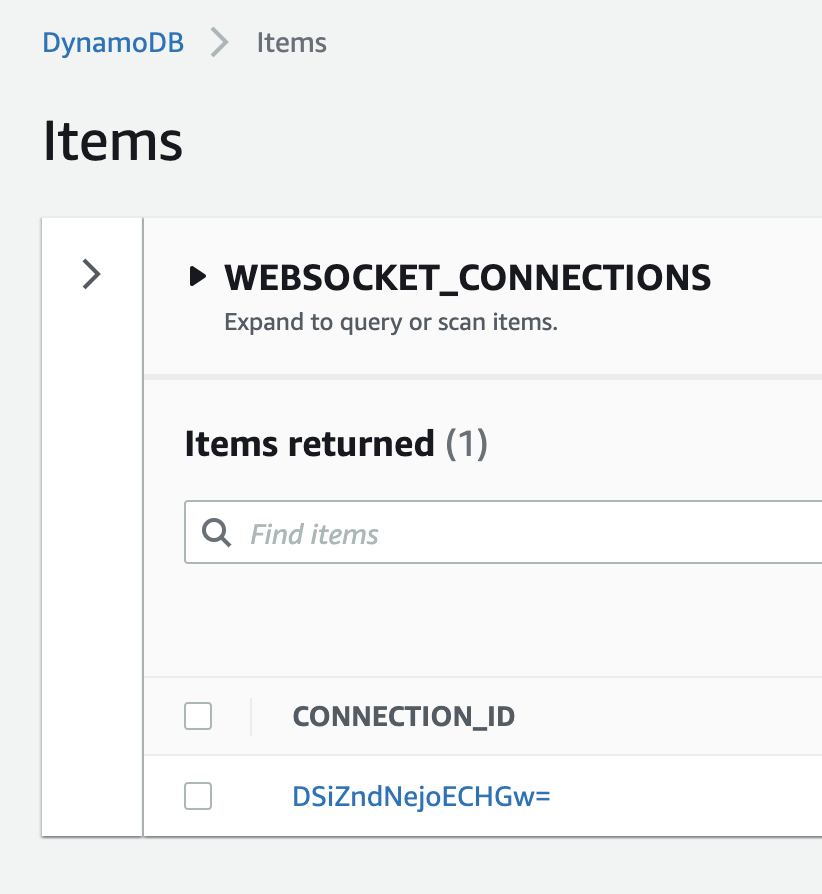
As soon as we connect, we can see that our DynamoDB table WEBSOCKET_CONNECTIONS has a connection ID persisted for the client:
Sending messages
In addition to the WebSocket connection, API Gateway exposes a Connection URL which can be used by the backend to send data back through the gateway over the WebSocket connection and back to the client:
https://[unique-id].execute-api.eu-west-1.amazonaws.com/dev/@connections/[connectionId]
To do so, you simply execute a HTTP POST request using the IAM Auth standard AWS v4 signature process (used with your AWS SDK).
On this URL, you can perform the following operations:
POST– Send a message from BE to WS clientGET– Get connection status of WS clientDELETE– Disconnect WS client
On calling POST, if the connection exists, the calling service receives a 200 OK response; otherwise, if the client does not exist, the calling service gets a 500 INTERNAL SERVER ERROR response – we can use this response to cleanup database state.
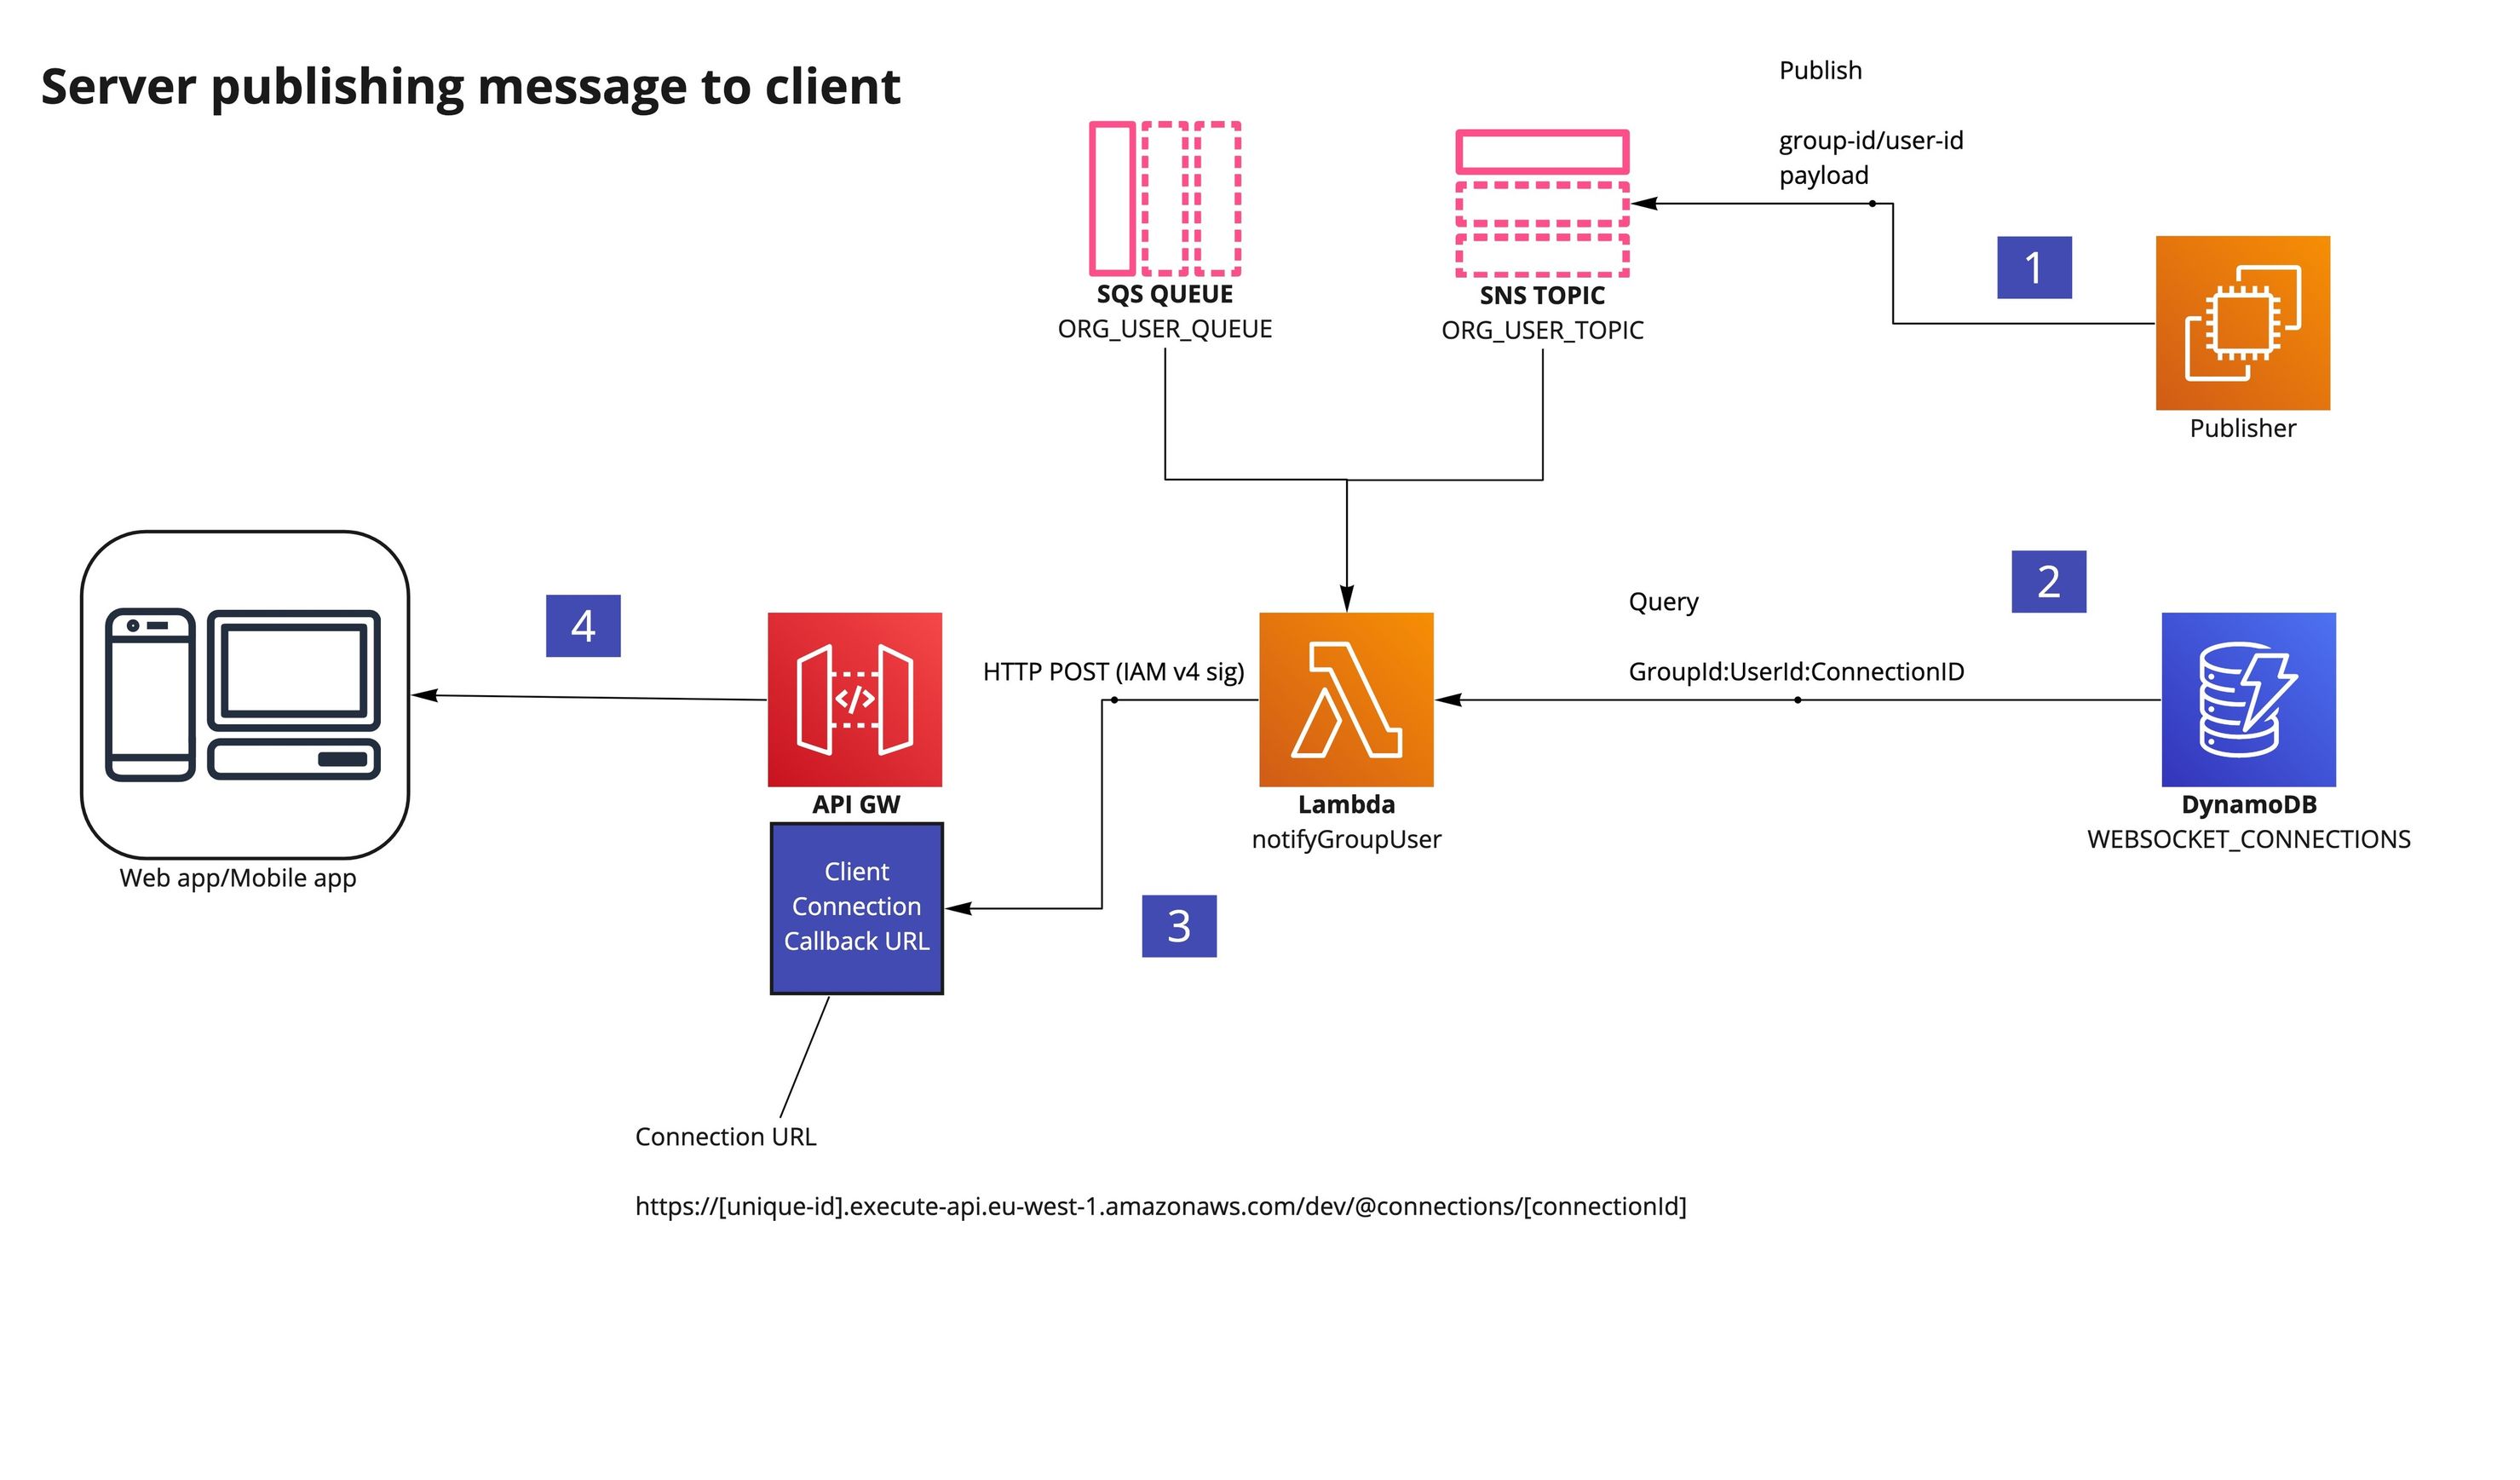
Using the connectionId , we can look up the userId as necessary and message user’s individually. In addition, you can persist other attributes such as the user’s group ID or company ID – to look them up by any combination of properties later. In the example below, with both SNS and SQS available, we can replicate the standard conventions of topic and queue semantics for asynchronous events in a serverless manner:
Sending messages – implementation
For our implementation, we create a Node.js Lambda called websocket-sendmessage [2]. This Lambda listens for events from API Gateway’s sendmessage route and sends the body of the message to all connected clients found in the DynamoDB WEBSOCKET_CONNECTIONS table.
Here’s a preview of how that looked:
We setup an environment variable here called TABLE_NAME, which points to WEBSOCKET_CONNECTIONS.
We need to create a sendmessage route in API Gateway and point it to our newly created Lambda.
To test, simply install websocat or wscat and run them from multiple Terminal windows to establish multiple WebSocket client connections.
Then send the following message {"action":"sendmessage", "data":"Hello world!"} eg –
Each connected WebSocket client should see a Hello world! message.
Here’s an example of the event in full, which comes from API Gateway and triggers our Lambda:
Disconnecting
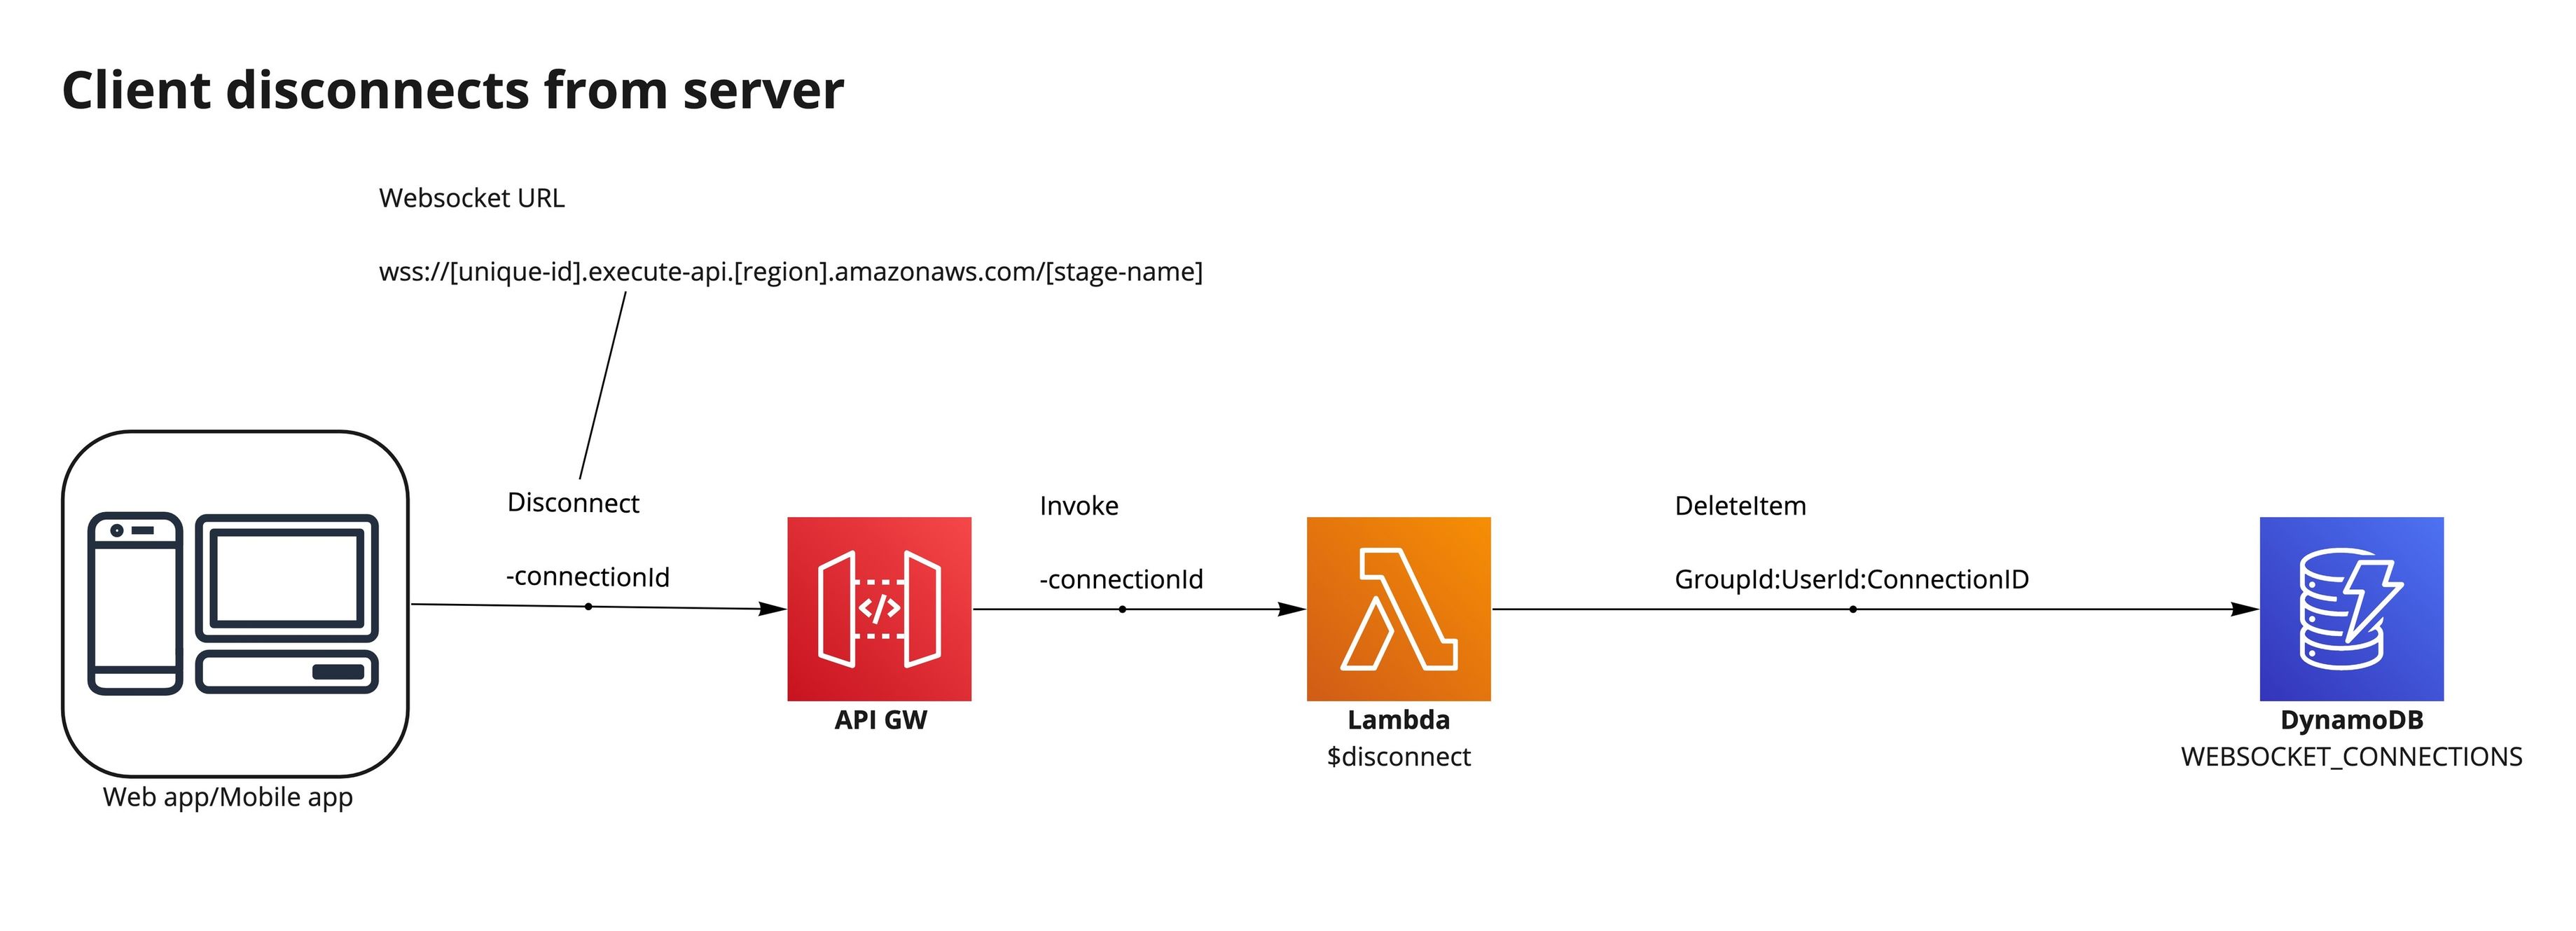
When the client connection is terminated, it can be done either on idle (when no message is sent back or forth for 10 minutes (see Limits below for details on heartbeat) or when the client intentionally closes the connection. In this case, API Gateway handles calling the $disconnect route and a Lambda cleans up state in the database:
Disconnecting – implementation
For our implementation, we’ll be using the DynamoDB table WEBSOCKET_CONNECTIONS, and a Node.js Lambda called websocket-disconnect[2]. This Lambda processes API Gateway events from the $disconnect route and looks for the client’s connection ID, removing it from our DynamoDB table.
We setup an environment variable here called TABLE_NAME WEBSOCKET_CONNECTIONS.
We then need to point our API Gateway $disconnect route to our newly created Lambda.
To test, simply install websocat or wscat and run them from multiple Terminal windows to establish multiple WebSocket client connections.
$ websocat wss://1234abcd.execute-api.eu-west-1.amazonaws.com/dev
As soon as we connect, we can see that our DynamoDB table WEBSOCKET_CONNECTIONS has a connection ID persisted for the client. When we terminate our WebSocket client, we will see that the connection ID is removed from our DynamoDB table.
Note that the $disconnect route is a best-effort event from AWS. Unfortunately, this means AWS does not guarantee delivery. In practice, we will see some stray connection ID records in DynamoDB over time, so it might be worth tracking the date and time of their creation and manually cleaning them up after the max connection time has elapsed.
Authorization
API Gateway can, of course, be secured using IAM. It can also be secured using Lambda AuthN (Lambda authorizers). However, the WebSocket specification itself does not provide an authorization solution. Instead, it passes responsibility to the developer to handle this before the WebSocket is created.
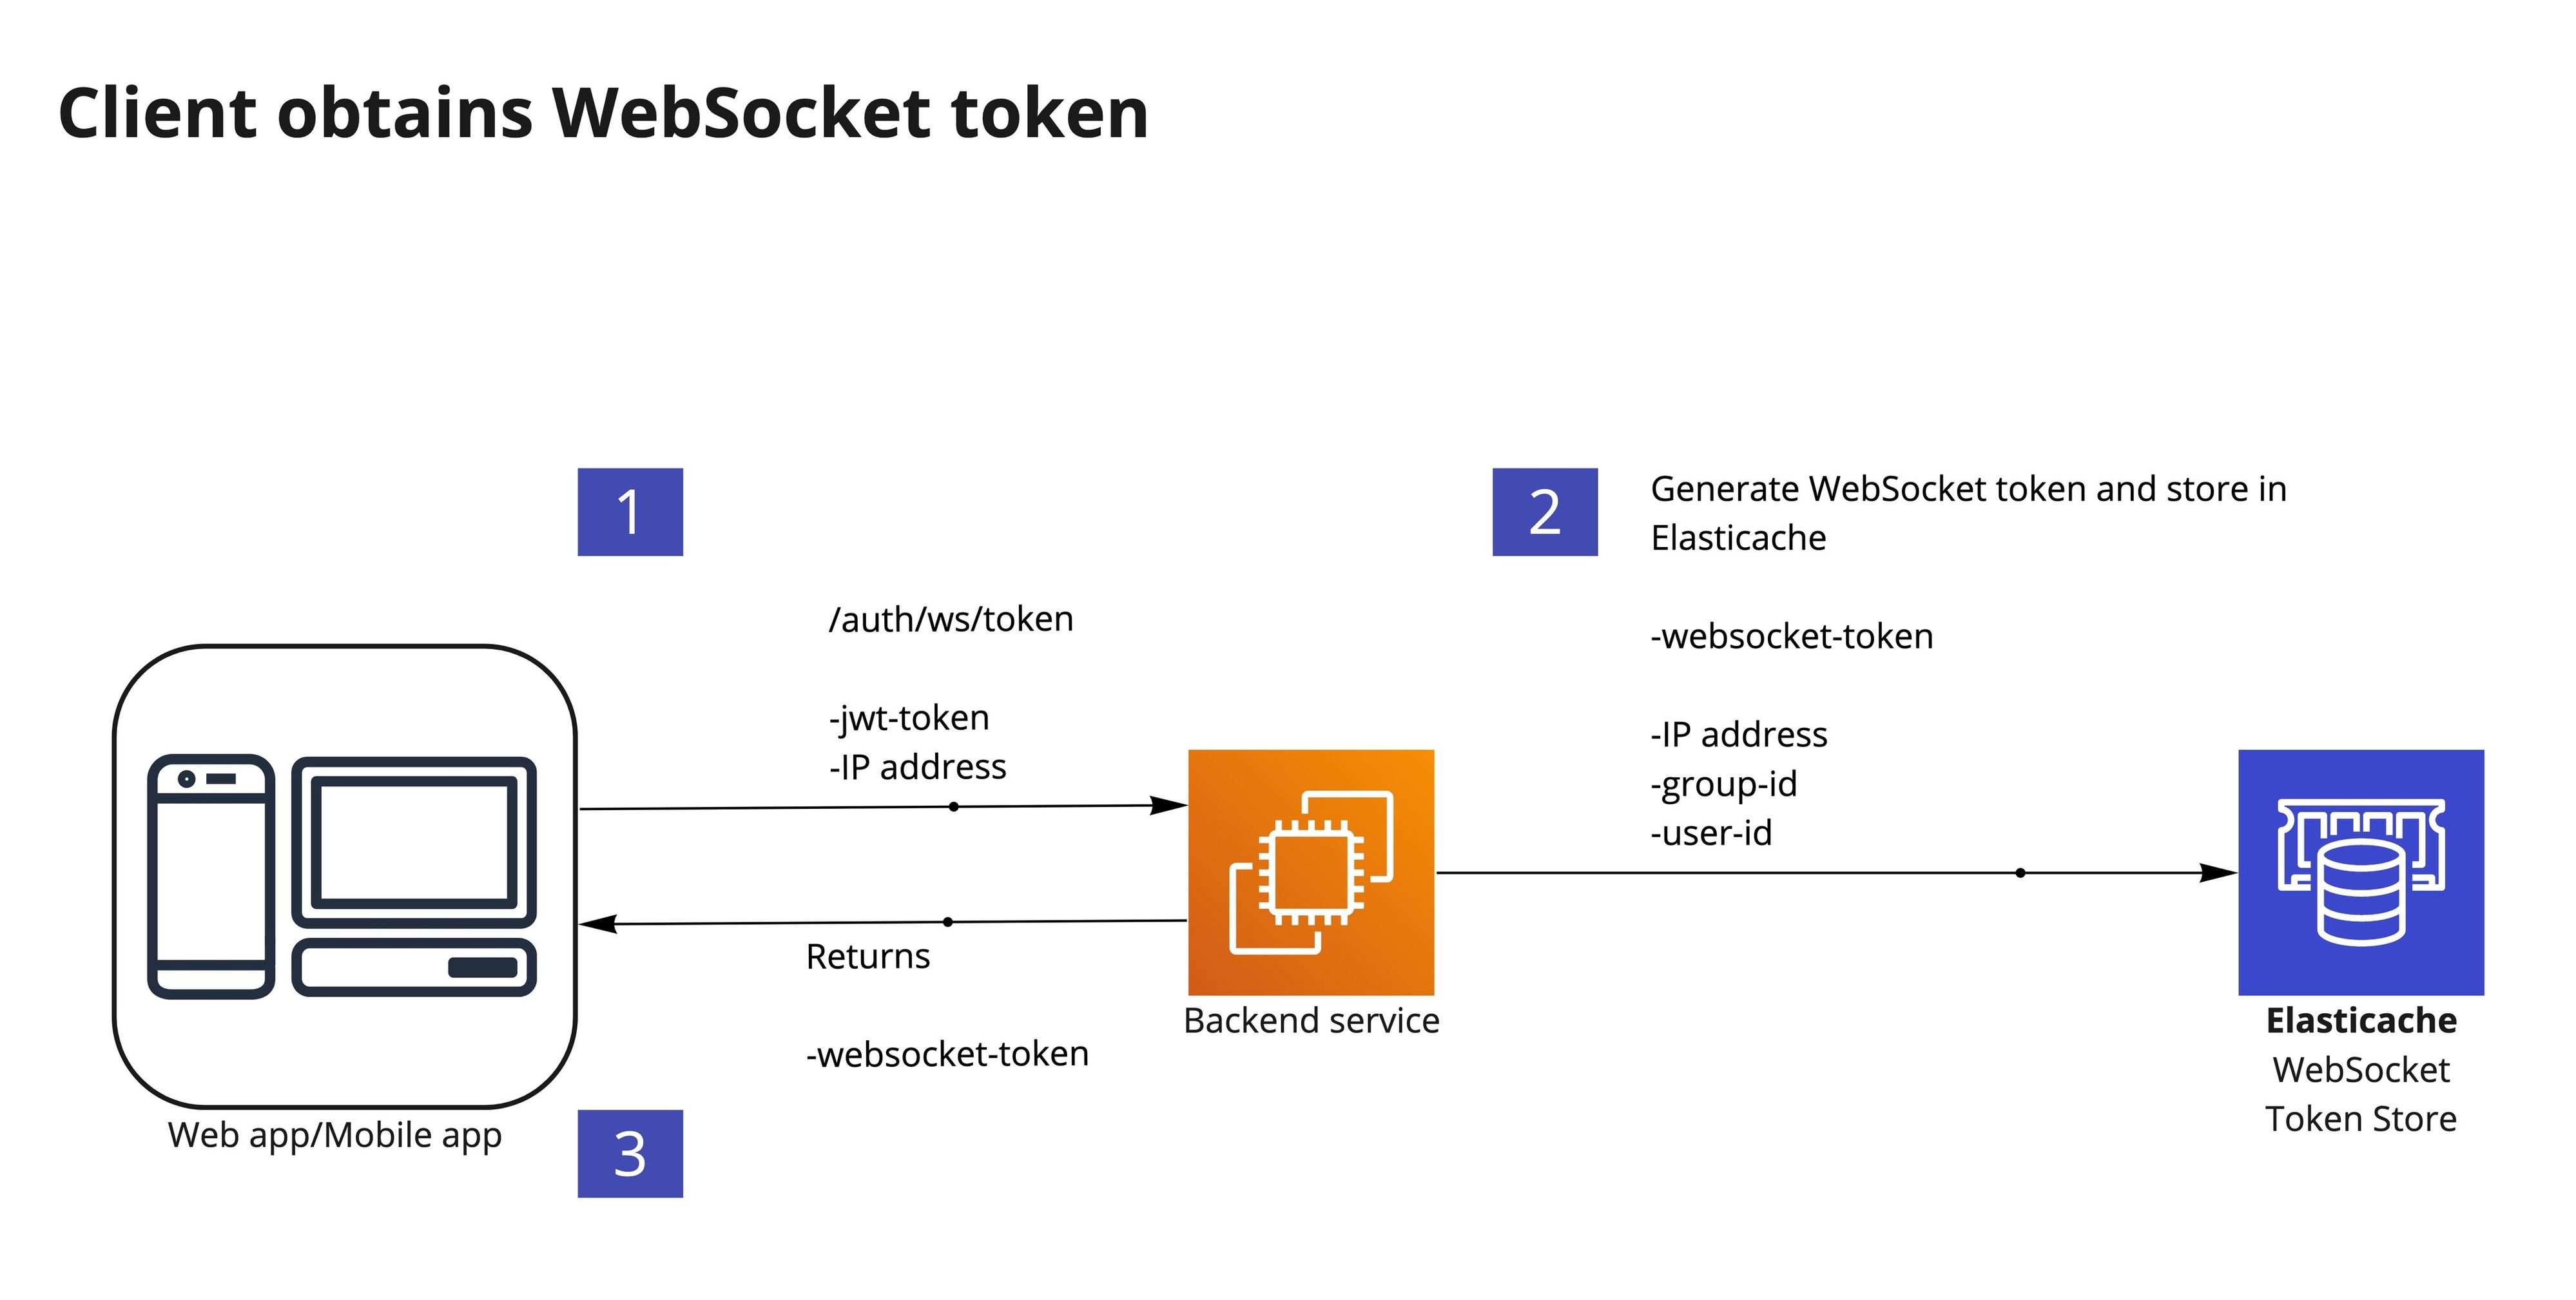
The recommended approach allows already authenticated clients (e.g. those authenticated via OAuth, JWTs etc.) to call a secured HTTP endpoint and obtain a token before establishing the WebSocket. This token should be short-lived and can be valid for only a few seconds. This token will contain the userId and internal attributes like the timestamp and IP used by the client when the token was generated. The ticket is persisted in a database or cache.
With that token, we can then call the $connect route, passing the token to the backend and validating it against the API Gateway Authorizer, verifying the ticket and comparing it against the source IP, validating that the ticket hasn’t been re-used or expired.
The token can be a JWT or a base64 encoded representation of the necessary data. A JWT based token has been presented below:
Monitoring, Limits and Throttling
There are a few limits related to API Gateway’s WebSocket implementation, the payload cannot exceed 128KB, and WebSocket connections are limited to a 2 hour lifetime with a default 10 minute lifetime if no traffic is sent – a heartbeat can be used to extend these 10-minute connections to a maximum of 2 hours.
Monitoring can be done using CloudWatch Logs, and CloudWatch Metrics and throttling can be performed on a per stage level, route level or usage plan level.
Performance-wise in our hello world example, the message results in a round-trip latency (RTT) of about 200ms on average, which is adequate for most use cases. However, if you’re building a latency-sensitive application, you might want to consider a more bespoke approach.
Summary
With the above in place, we have a serverless WebSocket solution using Amazon API Gateway, which provides connection and disconnection tracking and routes messages to connected clients. In addition, we explored how we would handle Authorization since WebSockets leave the onus on the developer to implement that outside of the WebSocket spec and typically using HTTP.
Have you used WebSockets, or how do you handle asynchronous events for your use case if not using them? Let us know, and for more information, check out our other blog posts below.
We’re hiring!
We’re looking for talented engineers in all areas to join our team and help us to build the future of broadcast and media production.