Our SSH access management evolution
Since the beginning of Grabyo, we have been running on the AWS cloud on top of Linux EC2 servers. Most recently, we have migrated all our microservices to Docker. This has reduced our dependency on SSH access. However, our media transcoding infrastructure still runs on top of Linux EC2 servers, so this is a challenge that we still need to deal with.
Initially, you might think that SSH access management is simple enough. However, the reality is that as you scale your team, it becomes a complex problem to solve. So today, we would like to share our journey around SSH access management and how it has evolved over the years.
Phase 1 — Simple SSH keys
It’s common in the industry to rely on SSH keys to govern user access to your servers. The solution is simple:
- You generate two asymmetric keys
- You install the public one on the server
- You distribute the private one (you must keep this key safe) to your users
At the beginning of Grabyo, we took this path. We created one pair of keys, deployed the public key in all our servers and stored the private one in our password manager solution to keep it safe and distribute it safely among our engineers.
However, when an engineer leaves the business, we must rotate these keys to follow security best practices. This solution did not allow us for an easy rotation of the keys.
At this point, we considered building some custom solutions:
- Performing a release in all our running servers to deploy the new SSH key. While this would work, it would be an insane amount of manual work
- Building a custom script that lists all our running servers and iterates through them, replacing the old key with a new one
- Build an agent that runs on the servers and regularly checks for SSH keys. If it finds a new one, it can replace the current one with the new one
We did not like the idea of using these scripts to perform these changes as they are critical, and we could lose complete access to our servers in case of failure.
Phase 2 — Managing SSH access at scale with Vault
What is Vault?
Vault centrally manages and enforces access to secrets and systems based on trusted sources of application and user identity. In simple terms, Vault is a secrets manager.
The solution
There are several ways to integrate Vault to govern SSH access into your Linux servers. We choose to enable Vault’s SSH Secrets Engine and One-Time SSH Passwords (you can read the whole setup here):
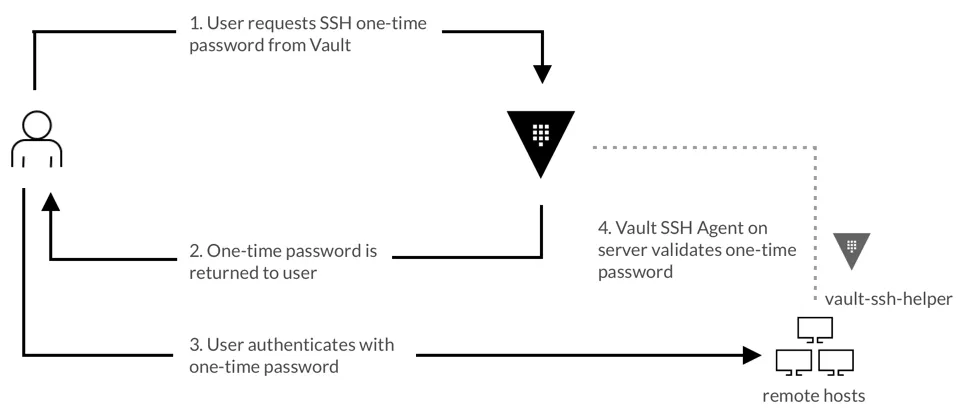
An authenticated client requests an OTP from the Vault server. If the client is authorized, Vault issues and returns an OTP. The client uses this OTP during the SSH authentication to connect to the desired target host.
When the client establishes an SSH connection, the OTP is received by the Vault helper, which validates the OTP with the Vault server. The Vault server then deletes this OTP, ensuring that it is only used once.
The administrator experience
As you can see, the solution brings a massive security improvement as we no longer need to manage SSH keys, and the OTP can only be used once by our engineers. However, this solution still brings some challenges worth mentioning:
- During onboarding and offboarding, we still need to create/destroy users in Vault
- To avoid giving access to all our servers to all our engineers, we need to create and maintain multiple policies in Vault to define which servers different engineering groups can access
- We still need to manage and support the Vault cluster to ensure high availability, scalability and patching. This includes Rekeying & Rotating Vault when some of our engineers leave the team
- We need to pre-install the vault-ssh-helper daemon in all our servers to communicate with Vault
The user experience
With this setup in place, we no longer rely on SSH keys removing the complexities of managing these keys at scale. Instead, our engineers only need to perform the following operations:
- Prerequisite: Have the latest vault command line tool installed
- Login to our Vault server (‘vault login’) using their credentials in our Identity Provider
- Request an OTP from Vault
- Login into the server and paste the OTP provided from Vault on the password prompt
Phase 3 — Amazon EC2 Instance Connect
The latest iteration of our SSH management at Grabyo involved migrating from our Vault solution to Amazon EC2 Instance Connect. You can read this blog post to understand the implementation.
The main benefits that this solution has provided us are:
- Because EC2 Instance Connect is a managed server, we no longer need to maintain a cluster of servers.
- We no longer need to maintain another set of user groups and policies in Vault. Instead, we can keep these groups in our IAM configuration, which we already use to manage other resources for our engineers.
- The permissions are aligned with our IAM policy language that the team is already familiar with.
- We no longer need an additional connection with our IDP as we can leverage our existing AWS SSO setup.
- Vault and EC2 Instance Connect can log all SSH access to the servers. However, EC2 Instance Connect provides this feature using AWS CloudTrail, making it more powerful and integrated with our existing security services like AWS Security Hub.
- There is no need to pre-install on all our servers the vault-ssh-helper daemon.
The user experience
As an engineer, these are the steps to connect to the servers:
- Prerequisite: Have mssh installed the make the user experience even more accessible.
- Login into AWS SSO. This is a step our engineers perform daily to access other AWS resources.
- Ssh into the server using the mssh user@instance-id
Final comments
When we first looked into improving our SSH access management, we discovered that building a reliable custom-made solution was not simple.
At this point, we migrated to Vault, which has been a great tool that solved all our challenges with some overhead. Most recently, we migrated our solution to AWS EC2 Instance Connect because it has considerably reduced that overhead.
It’s worth mentioning that one of the significant benefits of Vault over EC2 Instance Connect is that Vault is cloud provider agnostic. If this is an essential requirement for you, I would hands down recommend Vault as it’s reliable, robust and solves all the security concerns.
However, if you only need to support AWS, I would choose AWS EC2 Instance Connect, as it reduces the additional management overhead to almost nothing.
Thanks for reading!
We’re hiring!
We’re looking for talented engineers in all areas to join our team and help us to build the future of broadcast and media production.